


Review: Slice Fabrique from Making Memories
![]()
The Blogger’s Quilt Market Meetup is just around the corner and we are pleased to have Making Memories and the Slice Fabrique as a sponsor for the event. A few days ago, I received a surprise package on my door step. The wonderful folks at Making Memories were kind enough to send me a Slice Fabrique and accessories to review prior to the Meetup.
This spring has been so busy that my poor sewing machine is feeling quite neglected, so I couldn’t wait to pull out some fabric and give the Slice a try.

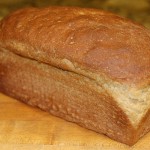
For those of you who aren’t familiar with the Slice Fabrique, it is a digital fabric cutting tool. What you see in the photo is the Slice Fabrique along with the Hands Free Kit, which comes with a 12″ x 12″ tempered glass cutting mat and a magnetic collar. The Slice Fabrique Starter Set comes with a smaller 6″ x 6″ tempered glass mat and requires hands while it cuts.
After getting all the fun toys out of the box, my first impression of the Slice Fabrique is that it seems very well made and solid. There is an attention to detail and a quality which really impressed me. But how does it work? After a quick read through the quick start guide I was ready to get started.
The first step is to plug it in to charge. Since I am impatient, I didn’t wait for it to charge, but used it plugged in. Having a cordless option is very nice.

The next step was preparing the mat with a little Repositionable Spray Adhesive. I went straight for the spray can, but you can use the foam brush and liquid adhesive too. The one time spray was sticky enough for multiple cuts in one sitting and when I was done it wiped easily off the mat with a cloth damp with water.

Last but not least, prepare the fabric by ironing on a fusible web product like Heat ‘n Bond Lite to the back side of your fabric… just like I would for most applique projects. I used the Slice Fusible Web, but I think any fusible web would work. On my next project I want to see if freezer paper works, for times when I don’t want adhesive on the back of my fabric.
It wasn’t long before my girls were looking over my shoulder and bending down to look through the clear casing to watch the Slice as it cut the fabric.

When it finished its first cut and I took the Slice off the mat, they both said, “Oh it didn’t work!” Then they both said, “Jinx.” “Double Jinx!!” “Triple Jinx!!!”……. don’t you just love 3rd graders? But when I got out the spatula and began to remove our butterfly… they were impressed and seriously excited.
After that it was a mad scramble to look through all the design cards and a lot of brainstorming about the projects they want to do. I must admit to feeling the same way. The cut was crisp and clean. And it was fast. This could be addicting.
The Slice comes with a Basic (but generous) Design Card that includes an alphabet with numbers, lots of iconic shapes like leaves, butterflies, flowers, vehicles, fruit and vegetables… and more.

In addition to the Basic Design Card, you can purchase additional design cards which makes the possibilities with the Slice Fabrique endless.

The design cards look similar to a camera’s memory card… and are just as easy to insert.
Here is an example of a few of the cards. My girls especially love Animal Frenzy:

My personal favorite is the frog. It would be so fun to use these to embellish a school bag or make a quiet book for a toddler. How about making a patch for a torn out knee? A little boy would love a puppy dog patch or an alligator. Oh my! I can envision lots of embellished tee-shirts too. An embellishment is a great way to cover a set in stain… talk about making lemons into lemonade!
I also love the Spring design card:

It was the first card I tried in fact, to make the butterfly to embellish a plain white tee-shirt.
In a matter of half an hour, I made about 10 perfect butterflies… even while learning how the Slice works, trying different fabrics and playing around with spacing.
This brings me to my one complaint about the Slice. I like to squeeze blood out of a turnip, and with fabric, I know how to maximize every inch. But with the Slice I had a little more fabric waste than I would have liked. Try as I might, I couldn’t figure out where the Slice would start cutting, so I was limited to cutting one shape out of about a 5″ x 5″ piece of fabric. That’s not a lot of waste, but much more than if I were cutting by hand.
I am confident with a pair of good, sharp scissors and some Heat ‘n Bond Lite or freezer paper, and a template traced in a sunny window. I can cut pretty intricate designs quite cleanly. But I have friends for whom fine cutting is a real challenge… and projects like making my Advent Calendar Pattern (with all the fine cutting of the numbers) is a little daunting. So the Slice Fabrique would be a great option for anyone who isn’t comfortable cutting by hand, but wants to stretch in their applique projects. It is also is nice for someone like me since, once you get the hang of it, it’s faster (and more accurate) than by hand… and there are a lot of fun template options.
Speaking of my Advent pattern, I was thrilled to see the ‘Tis the Season Design Card. There are more than enough templates to make a different small ornament for each the 24 Advent days. Another nice thing about the Slice is you can select the size of your design up to about 1 to 4 inches. SO COOL! It would be easy to make the ornaments less than 2″ so they fit in the Advent pockets. The Slice Fabrique would make short work of all that tracing and cutting. The Slice says it cuts through thicker fabrics like wools and felts, and I can’t wait to give it a try. When I do, I’ll be sure to post an update as to how it works.

In no time at all, I finished a darling embellished tee-shirt finished for my girls. I stitched around the butterflies using a small blanket stitch on my machine and added a little button for fun.
It’s the first of many projects and after Market, when I have a little more time, I’ll be sure to post an update.
UPDATE: I know for sure the Slice Fabrique is available for purchase at Oh My Crafts.


How cute! It is great. I really look forward to seeing a demo.
Hello,
I would love to see a sample of the felt cutting!
Hi All! Thanks Calli for such an awesome review of the Slice! A few comments: yes, the Slice works great on freezer paper if you don’t want to have fusible on the back of your fabric. However, I challenge all to use our fusible web because we’ve had many comments how nice and light it is. Also, make note that while there are other fusibles out there that work, ours will provide success 100% of the time.
One more note, if you’re coming to Quilt Market, stop by our booth and I will personally show you how to save fabric! It’s very easy once you see how to maneuver the machine.
what if we aren’t coming to Market? Is there a video or instructions somewhere on how to save fabric??
Thanks!
Wow…that is one awesome little machine! I think I may have to have one….Thanks for sharing!
I know this is old but I just wanted to say I have the slice Fabrique and I love it, it’s so quick, fun to use and easy, I don’t think it does waste fabric, yesterday on a 12 by 12 inch square I cut out “super Rose” and 18 flowers in next to know time amd still ahd some fabric left over for more designs. The easiest way I’ve found to get the best use of the fabric is once you’ve chosen and decided on your design is then when you press select so it shows you where it will start to cut you know where to place the slice (I’m sorry I’m not very good at explaining things) I always start in the bottom left corner, carry on along the bottom of the fabric and work upwards, this is the best way I’ve found. One thing I wish could be better is how often you have to change the blades, i did get quite a few cuts out with the first blade but I still think you should be able to do more as they are expensive, well they are for me as I only know of one place that sells them on line, I must do some more research. The basics card that’s standard with the machine (so far I only have two cards but am getting more for Christmas hopefully) is brilliant and does have some good basics on it. with the set I got, it came with a tube of glue and the spray adhesive, the spray is brill but the glue is awful, I will only use it if I’ve ran out of spray and haven’t got anything else, I have used heat and bond and it works very well and cheaper than the slice Fabriques iron sheets, I’ve also used sulkys version and again good results. I also always use a satin stitch to stich round he edges after I’ve ironed it on and even though this is a bit time consuming the results are fantastic, good old sewing machine
If you like gadgets then I think you’ll love the slice Fabrique, at the moment I’m making my daughter a super heros costume for a party (she is only 5) and if I didn’t have the slice it wouldn’t of looked so professional.
Sorry for boring you all.
Hi Jenn, thank you for the great advice. I too have continued to love the Slice… and I am much better at not wasting fabric.
Hi there! I’ m writing from Greece just because I want to buy the slice fabrique but I do not know where to find it. The making memories website seems that does not work and the amazon does not sell it! I would appreciate your help!