


Archive for May, 2010
I’m all a buzz, Nanette from Freda’s Hive is here

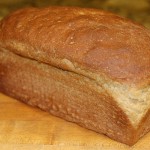
waffle cloth. When I made dish towels last year I thought it would
be good to make some dish cloths too, but I ran out of time. I finally
took an evening a couple weeks ago to make these dish cloths and it
was really easy and fun. I’ve since found out that (of course) I’m not
the first to make these waffle dish cloths. Lynn (thanks Lynn)
let me know that Amanda
Jean had written about this on her blog too. But I thought I would
post about mine anyway. What the heck.
carries it and Moda makes some waffle cloth too. You can also get
it here,
here
and here
among many sources. It comes in several colors and textures/patterns.
Lynn and the Amanda Jean post let me know that it is best to wash the
waffle cotton BEFORE sewing into dish cloths. Unfortunately I didn’t
think of that before hand and haven’t washed mine yet but I’ll
certainly prewash before making my next batch of dish cloths.
 I used my 9 1/2″ template to cut the waffle cloth into
squares.
 I’m always looking for ways to use “left overs”. I used
extra Jelly Roll strips from from the Moda
Sweet line. Don’t we all have extra Jelly Roll strips hanging
around? Yes. The 2 1/2″ strips worked out just great. There was enough
length to join the ends of the binding with a bit to spare.
 I just sewed the strip on the waffle cloth like regular
quilt binding.
 Then I pressed the binding flat and then pressed it
folded over to the back of the cloth.
 I top stitched some of the binding, stitching on the
front so that it caught the binding on the back of the dish cloth.
 And some of the dish cloths I stitched in the ditch,
catching the stitching on the back of the binding. I think either one
worked well and it would be a personal preference which method to use.
 This is a view from the back where you can see the
stitching is close to the edge and does tack the binding in place.
 Here is another view from the back. It was an easy project and it makes a very simple and
inexpensive gift. I used them last weekend to give to my sisters and
friends along with some great smelling countertop spray I bought on
sale here.
And no, I didn’t pay the price they have listed.
-nanette
Cluck. Cluck. And Sew a Camera Strap
I love Cluck. Cluck. Sew. It’s always one of my favorite blogs to drop in on and find inspiration galore. I’m thrilled to have Allison here today to show us her wonderful tutorial. I wish I had this stylish camera strap on my camera right now. If there’s one thing I’m doing today it’s taking lots of pictures. Take it away Allison…
Hey all you Make it Do readers! I’m Allison from Cluck.Cluck.Sew. and I’m so excited to be here guest posting for Calli while she’s on vacation! Today I’m going to share how to make a cover for your camera strap. Lets get to it!

These are really easy, and make a great gift. They fit any standard DSLR camera strap, (Canon/Nikon) my strap is about 2″ wide. I made mine two sided, but if you wanted just one fabric, just make one strip about 5.5″ wide.
1. Cut two strips 2.75″ by 26″ long.

2. Sew the strips right sides together, then press seam open.

3. I made mine padded with Pellon fusible light fleece interfacing. You need about 5.5″by 26″. This is optional of course, I like the feel of the padding, but you can skip this step if you don’t mind the hard strap. Iron on the fusible interfacing according to directions, and trim excess.

4. Fold one end in about one inch, and then again over one inch to hide the seam and make a clean finish.

5. Sew edge down for a clean finish, I sewed three lines, 1/4″ apart so the ends will be more sturdy and it looks more polished.

6. Do the same thing on the other end, the finished strap after the ends are finished will be about 22″ long.

7. Sew right sides together with a 1/4″ seam allowance. If you think the finished cover will be too big for your strap, you can make a wider seam allowance to make the cover thinner. Keep in mind you want the cover about half an inch or so bigger than the strap, so its easy to slide on and off. 
8. trim the inside edge seam allowance, it makes more room to slide the strap in and out.

9. Turn inside out (the hardest part) and iron and your done! Slide in your camera strap and viola!


