Hi, I’m Calli
Welcome! If you enjoy your visit, be sure to follow me:
Oh My Stars!
Canning Day Quilt

Posts Tagged ‘tracing an embroidery pattern’

Tracing your Embroidery Design Three Ways

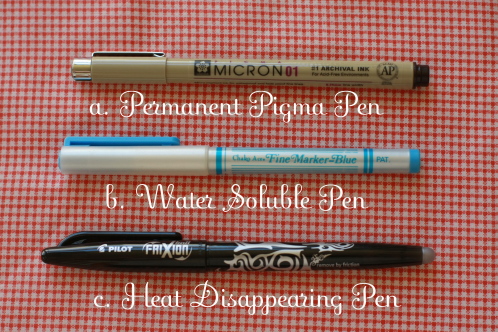
There are lots of solutions for tracing an embroidery pattern to fabric.  There are printable transfer papers and iron-on patterns.

Or there is the low tech method of simply tracing your pattern by hand to fabric.  I’m so low tech, that I typically trace by taping pattern and fabric in a sunny window or if I’m tracing on white… sometimes just on the kitchen table.  I’d love to have a light box but I until then, the window is just fine.

I’ve used different pens depending.  Here are the three pens I’ve used for tracing my patterns and the pros and cons of each:

a. Fine Point Brown Permanent Pigma Pen

For my Make it Do embroidery that I stitched this summer, I traced the pattern with a Brown Pigma Pen.  This is what my mom uses and taught me to use.  I love using a brown Pigma for lots of reasons.  Just be sure to buy a light brown Pigma pen.  I choose a .25 mm fine point pen- has an “01” on the end.

Pros:

  • Pigma pens are crisp and easy to write on fabric
  • The very fine point allows for fine detail
  • Can be ironed or gotten wet without disturbing the pattern
  • I love it for red work especially

Cons:

  • Permanent- so a mistake in tracing the pattern is not fun
  • Because it’s permanent, you need to be more accurate with stitching (like when doing a satin stitch)
  • Will blob a little here and there – but never enough to show past my stitching

b. Water Soluble Pen

My go to pen when letting the kids do the tracing or when tracing for kids…  a Fine Water Soluble Marker is easy to trace with and even easier to make disappear.  I love to add fusible fleece to the back of my embroidery projects.  The fleece on the back makes for much crisper, more accurate stitches, since the fabric doesn’t pull and stretch as much.  I apply the fleece to most of my projects that are for pillows or framing… just not a dishtowel for obvious reasons.   Since the water soluble pen is not heat sensitive you can iron on the fleece after tracing the pattern- just be sure to turn off the steam.

Pros:

  • Very easy and smooth to trace with- my 9 year old daughter traced the sweet elephant embroidery above
  • SO, SO easy to make totally disappear with just a spray of water from a water bottle- also perfect for kids with stitches that are exactly accurate!
  • Not sensitive to heat

Cons:

  • Much more difficult to draw an intricate design- because of thickness of the point and the fact that it bleeds more
  • Need to be careful around water.  My daughter spilled a cup of water while she was embroidering…. and, so sad, her pattern was gone.  Since we already had fusible fleece on the back… retracing wasn’t so easy.

c.   Heat Disappearing Pen

This is a new fangled pen-  at least for me.  It’s a Pilot FriXion Pen.  Which is a fine ball point pen.  I used it for my latest Halloween embroidery that I’m working on now.  Here’s how it works.

Simply write on the fabric.  And when you are ready for the writing to disappear.  Apply a hot iron….

And voila!  It disappears.

Pros:

  • Can draw a fairly intricate design… though not as easy as the super fine point Pigma
  • Not permanent
  • SO, SO easy to make disappear with just a hot iron

Cons:

  • I can’t iron on the fleece at all… unless I want my work to disappear before my eyes.
  • I’m not super fond of how it writes on fabric… the ballpoint can be thrown from your intended line ever so slightly by the weave of the fabric.
  • You can’t iron your fabric if it gets wrinkled or you need to press a seam.

So there’s my take on the low tech options for tracing an embroidery pattern.  Do you embroider?  What’s your favorite method?  I think I will continue to use all three types of pens… depending on my needs and my mood.

Archives


Virtual Quilting Bee