Hi, I’m Calli
Welcome! If you enjoy your visit, be sure to follow me:
Oh My Stars!
Canning Day Quilt

Posts Tagged ‘sewing’

Making an Easy Easter Table Runner

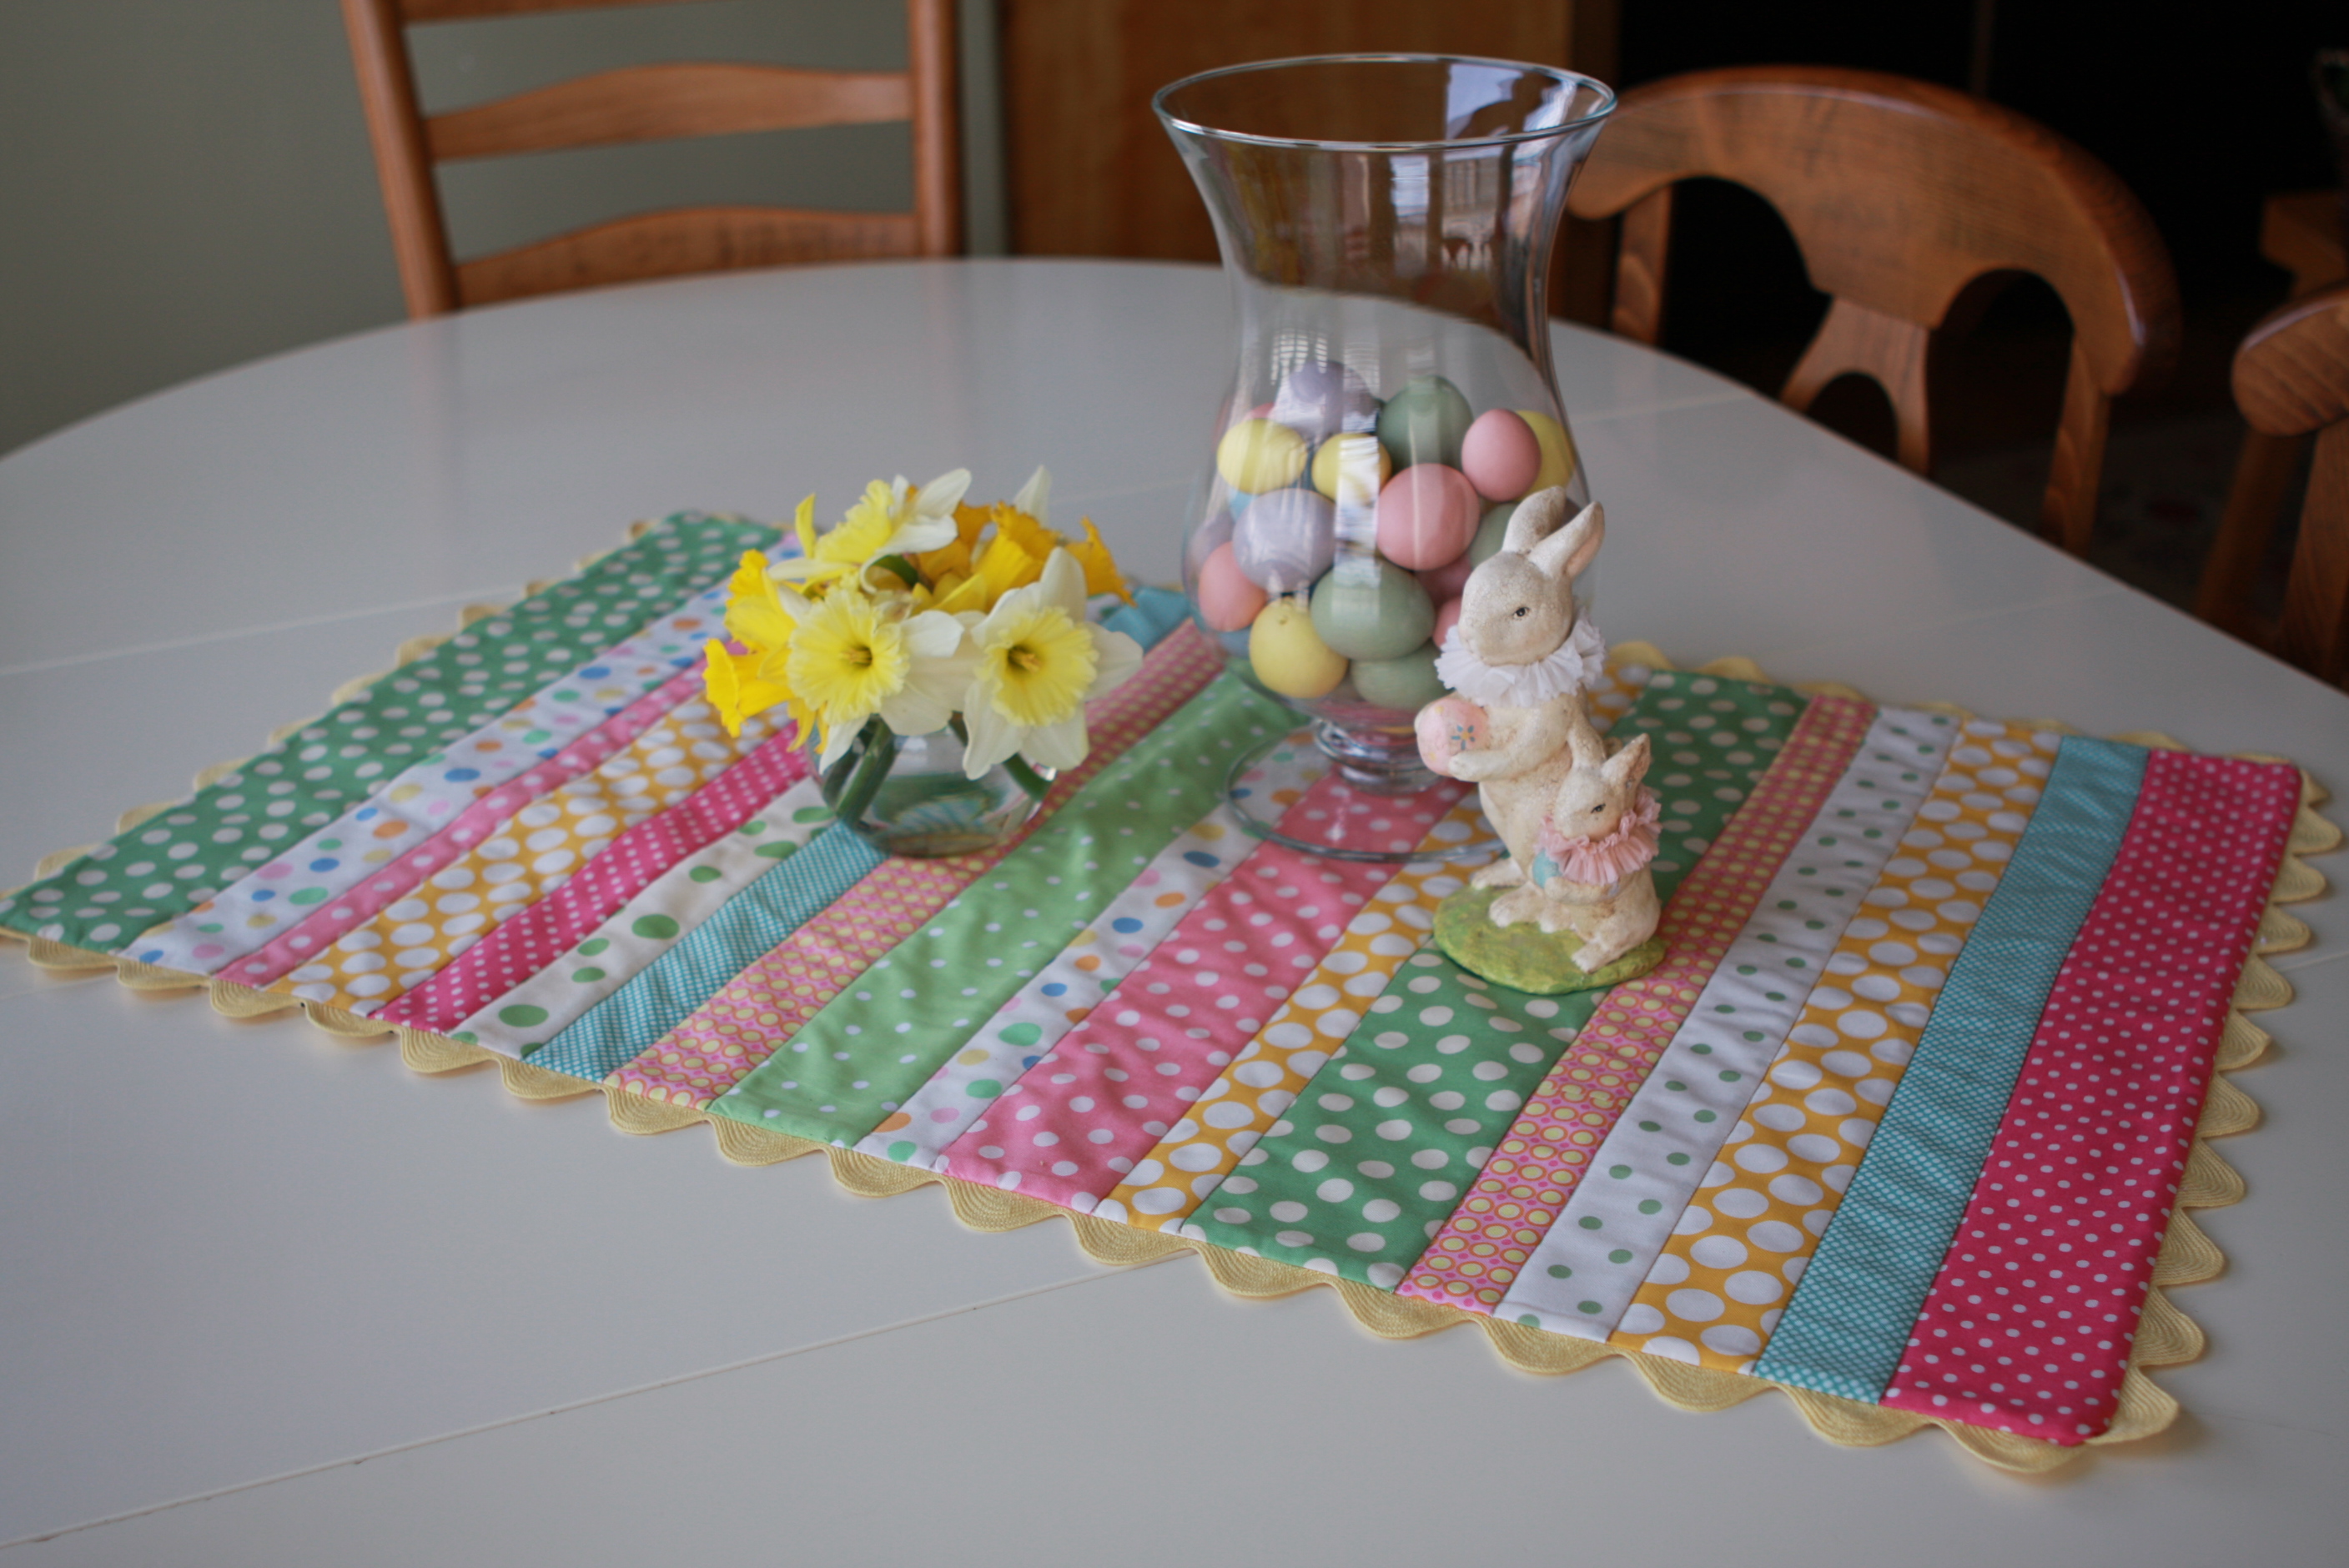
After making several quilts using polka dot fabrics, my Mom had some great scraps.  So we got together yesterday to “Use Them Up.”  The fabrics were mostly small pieces, so we had to be creative.  The end result was this wonderful table runner just in time for Easter.

img_0797

You can make your own Runner using up scrap fabric or buy new.  Either way it’s a fun, easy and inexpensive project.  It took us about three hours to complete the Runner.  I was so happy to use the large rickrack.  I’m not sure what it is about rickrack, but I really love it.  The great part is this project can be adapted to any holiday or season.  To make this project you will need

  • Strips of fabric 1 1/2 inches to 3 1/2 inches wide and 18 inches wide.  We used 18 strips but you can customize to the size of your table. (Don’t worry if you need to piece some of the strips, we did on this project)
  • Fabric back
  • Thin cotton or cotton blend quilt batting
  • We used 4 yards of rickrack (but it depends on how long your runner will be.)

Here’s how to make it:img_0595 1.  Start by cutting your fabric into strips of varying widths.img_0609

2. Arrange the strips until you are happy with their order.  Make sure to vary the widths and size of the pattern.img_0622

3. Using a 1/4 inch seam sew the strips together.  Don’t worry if the ends aren’t perfectly lined up.  As you sew each strip together press all the seams in one direction.  (Make sure to press each time you add a strip.)img_06452

4. Using a ruler and an Olfa cutter, straighten the ends.img_0657

This photo shows where to place the rickrack when pinning.

5. Working one side at a time pin the rickrack to the edges leaving it an inch longer on each end.  Crisscross ends and pin the next side until rick rack goes all the way around.

6. Sew rickrack to runner with 1/4 inch seam.  Make sure to use the middle of rickrack as your guide.img_0672

7. Cut the back and the batting 1 inch bigger all the way around.

8.  Layer first the batting to wrong side of back, then right side of pieced top to the right side of back.  Pin together.

9. Following the sewing line of the rickrack, sew all the way around, leaving a 6 inch opening on one of the sides.

img_0694

Don't panic (like I did!) she is not cutting off the trim. The rickrack trim is on the inside of the seam. It will show when you turn and press.

10.  Trim sides to 1/4 inch from seam and clip corners.

11. Turn and press.

12. Stitch opening shut by hand.

13. Machine quilt (or hand quilt if have nothing but time on your hands) in the ditch.  (For the non-quilters, the ditch is the strip seams.)

img_0773

I am so happy with our finished project, and it looks really great on my table.  But, if you are feeling even more creative you could iron-on a bunny or flowers and finish with a blanket stitch.  What about adding buttons or trims?  Use your imagination.  Don’t be afraid, perfection is over-rated anyway.  I saw this quote on a notebook in my Mom’s sewing room and wanted to pass it along.

img_0680

Many thanks to Nadine from Material Girls Quilts for the great supply of polka dot fabrics. http://www.thematerialgirlsquilting.com/ Check out her store for lots of wonderful fabrics and creative ideas.  (Most of my apron fabrics come from Material Girls too.)

Make your kids something Ugly

img_0566

Emma sketched a few ideas for her doll. Mrss. JHooee and Mrss. Bananana

Lily and Emma have been talking about Brookie’s ugly doll for weeks…  “Brookie shared her ugly doll with me on the bus.  Will you help me make an ugly doll like Brookie?”

Brooke is our darling 8 year old neighbor.  Santa brought her a sewing machine for Christmas.  And she has been putting it to good use making ugly dolls.  But what is an Ugly Doll?  After a quick internet search, I discovered that they are an oddly ugly/cute kind of doll.  I’ve noticed them in movies before, but never knew what they were called.  You can find their website at http://www.uglydolls.com/.  The industrious Brooke designed her own doll inspired by Ugly Dolls.  And this past weekend that’s exactly what Emma, Lily and I did too.  Here’s how:img_05362

1. Draw a template out of paper and cut it out.  Remember that you will need at least a 1/4 inch inseam, so make the template big enough to accommodate.  (Or do what I did and simply cut out the fabric at least a 1/4 inch beyond the template.  Just be sure to be consistent.)  Remember the simpler the design of the doll, the easier it will be to make it look good.  I offered to make the girls totally different style dolls, but when they saw the finished design for Lily’s they both had to have it.  One trick for creating your template is to draw it out, pick the best side of your drawing, fold your template in half with the good side up and cut it out.  That way your doll will be symmetrical, unless of course you want it asymmetrical.

2.  Fold the fabric so that right sides are together.  Pin the template to the  fabric and cut out.  Now you have the front and back sides of your doll.

3.  Make a small round template for the eyes and cut out.  I used wool felt.  There is no seam allowance for the eyes, so they should be actual size.  Have fun, make more than two (or just one!)

4.  Using a blanket stitch, stitch around the eyes.  My sewing machine does a blanket stitch which I used.  But if yours doesn’t, it is very simple to do it by hand.

5.  Make a french knot for the pupil of the eyes.

img_05416.  I drew the mouth using a fabric marking pen.  Using a tight zigzag stitch on your machine, stitch the mouth.

7.  We cut out a tongue of wool felt and sewed it on with a blanket stitch.

8.  Place front and back of doll with right sides together.  Using a 1/4 inch seam stitch around the doll, leaving an opening to turn and stuff.
img_05509. Use a chop stick to turn the dolls right side out. Then fill with a fiberfill stuffing. I didn’t have any, so I made do with batting. I let the girls do most of the stuffing, because they wanted to be part of making the dolls. The batting we used did leave the dolls a bit lumpy but the girls don’t care.

10.  Once stuffed, stitch the opening shut by hand. img_0572Lily and Emma are so in love with their new ugly dolls that they have slept with them the last two nights.  Their dolls have gone with them everywhere, including school, safely tucked in their backpacks, of course.  The whole project took about 3 hours to make two dolls and the cost was a few dollars in material.  But the end result is so much better than if I gone out and spent $40 on store bought toys.  I love companies like Ugly Doll who are creative and have heart.  And I would love to support them… but sometimes there is nothing better than “Making it Do.”  You see, on Saturday I was able to spend time making memories with my girls.  We used our imaginations (I got to meet Mrss. Bananana and Mrss. Jhooee!)  And the girls love their dolls all the more because they designed them, chose the fabrics and worked hard to create them.  Wait, did I just say work?  We thought we were just having fun.

img_0585

Lovely Lily and Mrss. Jhooee


Archives


Virtual Quilting Bee