


Winter Days

January should be a month that goes by slowly… but this January has simply flown by.
I’m wanting snowed in days, soup and warm bread days, stitchy days… slow days.

I’m happy to have gotten in a little time at my sewing machine at least. Phew. It feels so good.
I’ve started playing with a new quilt… which will probably be as big as when my fabrics run out… and is a make it up as I go along kind of quilt. Hurray for nine patches and for the sashing… a Michael Miller gingham in a delightfully sour green.

I’ve made more Wide Open Zippered Pouches. They are just so darn fun to make… and so often requested.
This one is for Lily’s embroidery. I let the girls pick their fabrics.

Emma loves this Lecien Old New fabric… she keeps picking it out for whatever I’m sewing for her.
And speaking of Lecien, I was just told that it is pronounced “Lou shin.” Is that correct? I’ve always called it “Lee shin.”
Got to run, the girls are putting on Sherlock and my sewing machine is calling.


Patty’s Gentler Times Minestrone Soup

I’m so happy to be able to share this recipe.
Yes. It is an absolutely delicious soup.
But this soup has a little story…
If you are a quilter from Utah, I’m sure many of you remember and miss Gentler Times.
It was one of the most wonderful quilt shops you could imagine- nestled away in a lovely old house, it was a favorite place to take quilt classes, find wonderful fabric, and small treasures.
My mom, Leslie Ison, worked and taught quilt classes there for many years. As kids, it felt like we were always popping in and out of Gentler Times. I know my love of fabrics took seed there.
One of the owners of Gentler Times was named Patty.
Patty is one of a kind. In a good way.
She has an abundance of talent, style, flair, energy, and heart.
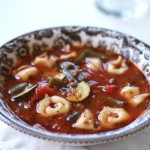
This soup is her recipe. She would make it and bring a big pot into Gentler Times to be served at a class or event. Just like Patty, there is nothing boring about this soup. It is full of flavor and flair.
True to form, the written recipe I received from Patty was a VERY creative… a pinch of this and a bit of that. So I’ve done my best recreating the recipe with measurements… for those of you who have had Patty’s soup, let me know if I’ve got it right.

This recipe makes a BIG pot folks, so make it and share some with friends… or freeze half for later.

A lot a yummy ingredients go into this soup… but like all good soup recipes, it a guideline, not a rule. You can easily make it vegetarian by leaving out the hamburger and using vegetable broth. Or switch up the beans…

The vegetables are also flexible- add or leave out veggies as you please. But do yourself a favor and make it Patty’s way the first time around. She’s got lots of wonderful greens in the soup. I especially love the addition of cabbage and spinach, which I don’t usually see in a Minestrone recipes.

Patty’s Minestrone Soup
- 2 tablespoons olive oil
- 1 large onion, diced
- 1 rib of celery, chopped
- 2 large carrots, diced
- 3 cloves garlic, minced
- 1 lb. hamburger
- 1/2 cup red wine
- 1 cup chicken broth
- 1 – 64 oz. can V-8 Juice
- 2 – 15 oz. cans stewed tomatoes
- 1/4 cup catsup (optional)
- 3/4 cup pasta of choice (small is best)
- 1-1/2 cups green beans, chopped into bite-size pieces
- 1 bay leaf
- 1 teaspoon Italian seasoning
- 1 cup chopped cabbage
- 1 small zucchini, quartered and sliced
- 1 cup chopped spinach
- 1 can garbanzo beans, drained and rinsed
- 1 can kidney beans, drained and rinsed
- salt and pepper to taste
- 1/4 cup fresh chopped basil
In a large sauce pan or dutch oven heat olive oil over medium heat. Add onion, celery and carrots and season with salt and pepper to taste. Stirring often, cook until vegetables are soft, about 5 minutes. Increase temperature to medium high and add hamburger and garlic and cook until meat is browned, about 7 minutes. Salt and pepper to taste. Pour in wine, and be sure to scrape up the brown bits from the pan. Add chicken broth, stewed tomatoes (I like to make sure the tomatoes are chopped somewhat small for my kids), catsup, and V-8 Juice. Bring to a boil and add green beans, cabbage, bay leaf and Italian seasoning. Cook at a low boil stirring occasionally about 15 minutes until green beans and cabbage are softened. Add pasta, zucchini, spinach and beans and cook until softened about 12 more minutes, until pasta is cooked. Season with salt and pepper to taste. Remove bay leaf and add fresh basil just before serving.
Garnish with grated parmesan cheese if desired.
Thanks Patty for sharing this wonderful recipe!


